Summary
This article explains how to add and update Regular Givers using the Regular Payments section in FundraiserOne. In addition to managing regular giver records, users can use FundraiserOne to monitor and analyse regular giving activity. This includes running reports to review active and cancelled regular gifts, payment schedules, donor details, and giving trends. Users can also access regular giver performance reports to measure programme growth, track retention rates, monitor donation values, and identify opportunities to increase donor engagement.
Adding a new regular payment
When a supporter wants to become a Regular Giver, they must have a Regular Payment record. This record defines their recurring donation schedule, including the donation amount, payment frequency, and payment method.
Step 1: Find or Create the Contact
Locate the supporter’s existing contact record in FundraiserOne. If the supporter does not already exist in the database, create a new contact record before proceeding.
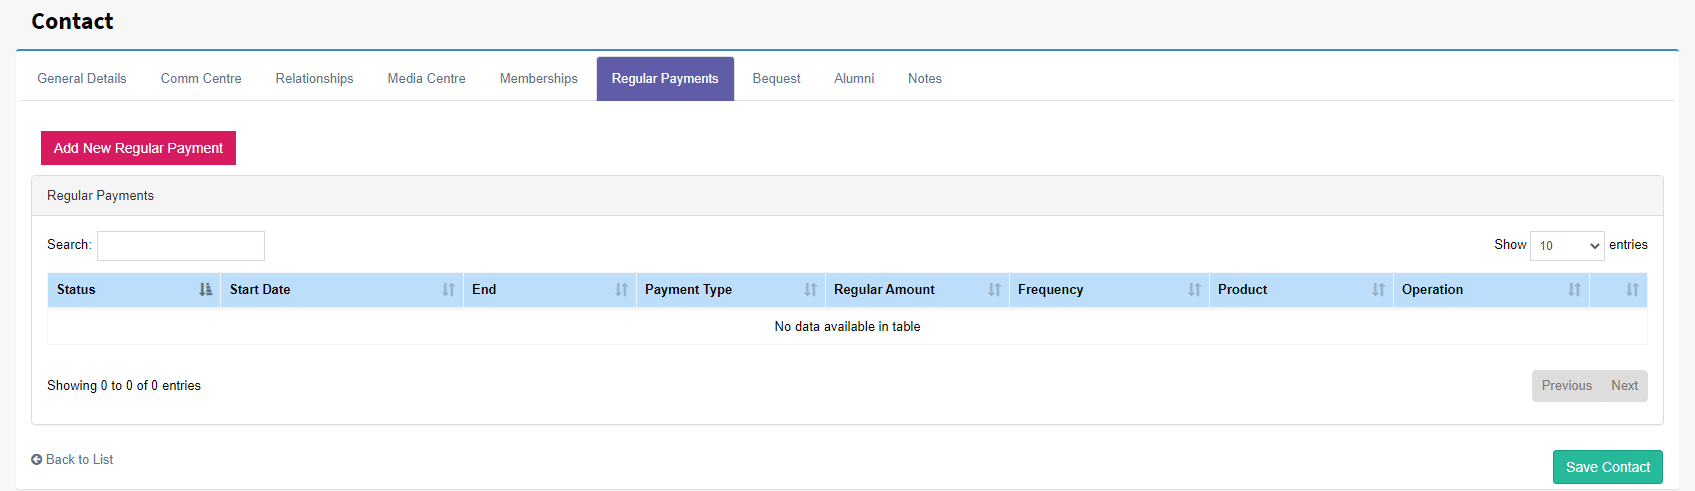
Step 2: Open the Regular Payments Tab
Open the supporter’s contact record and select the Regular Payments tab, as shown below. This section is used to create, view, and manage all regular giving arrangements associated with the contact.
Screenshot: Regular Payments tab
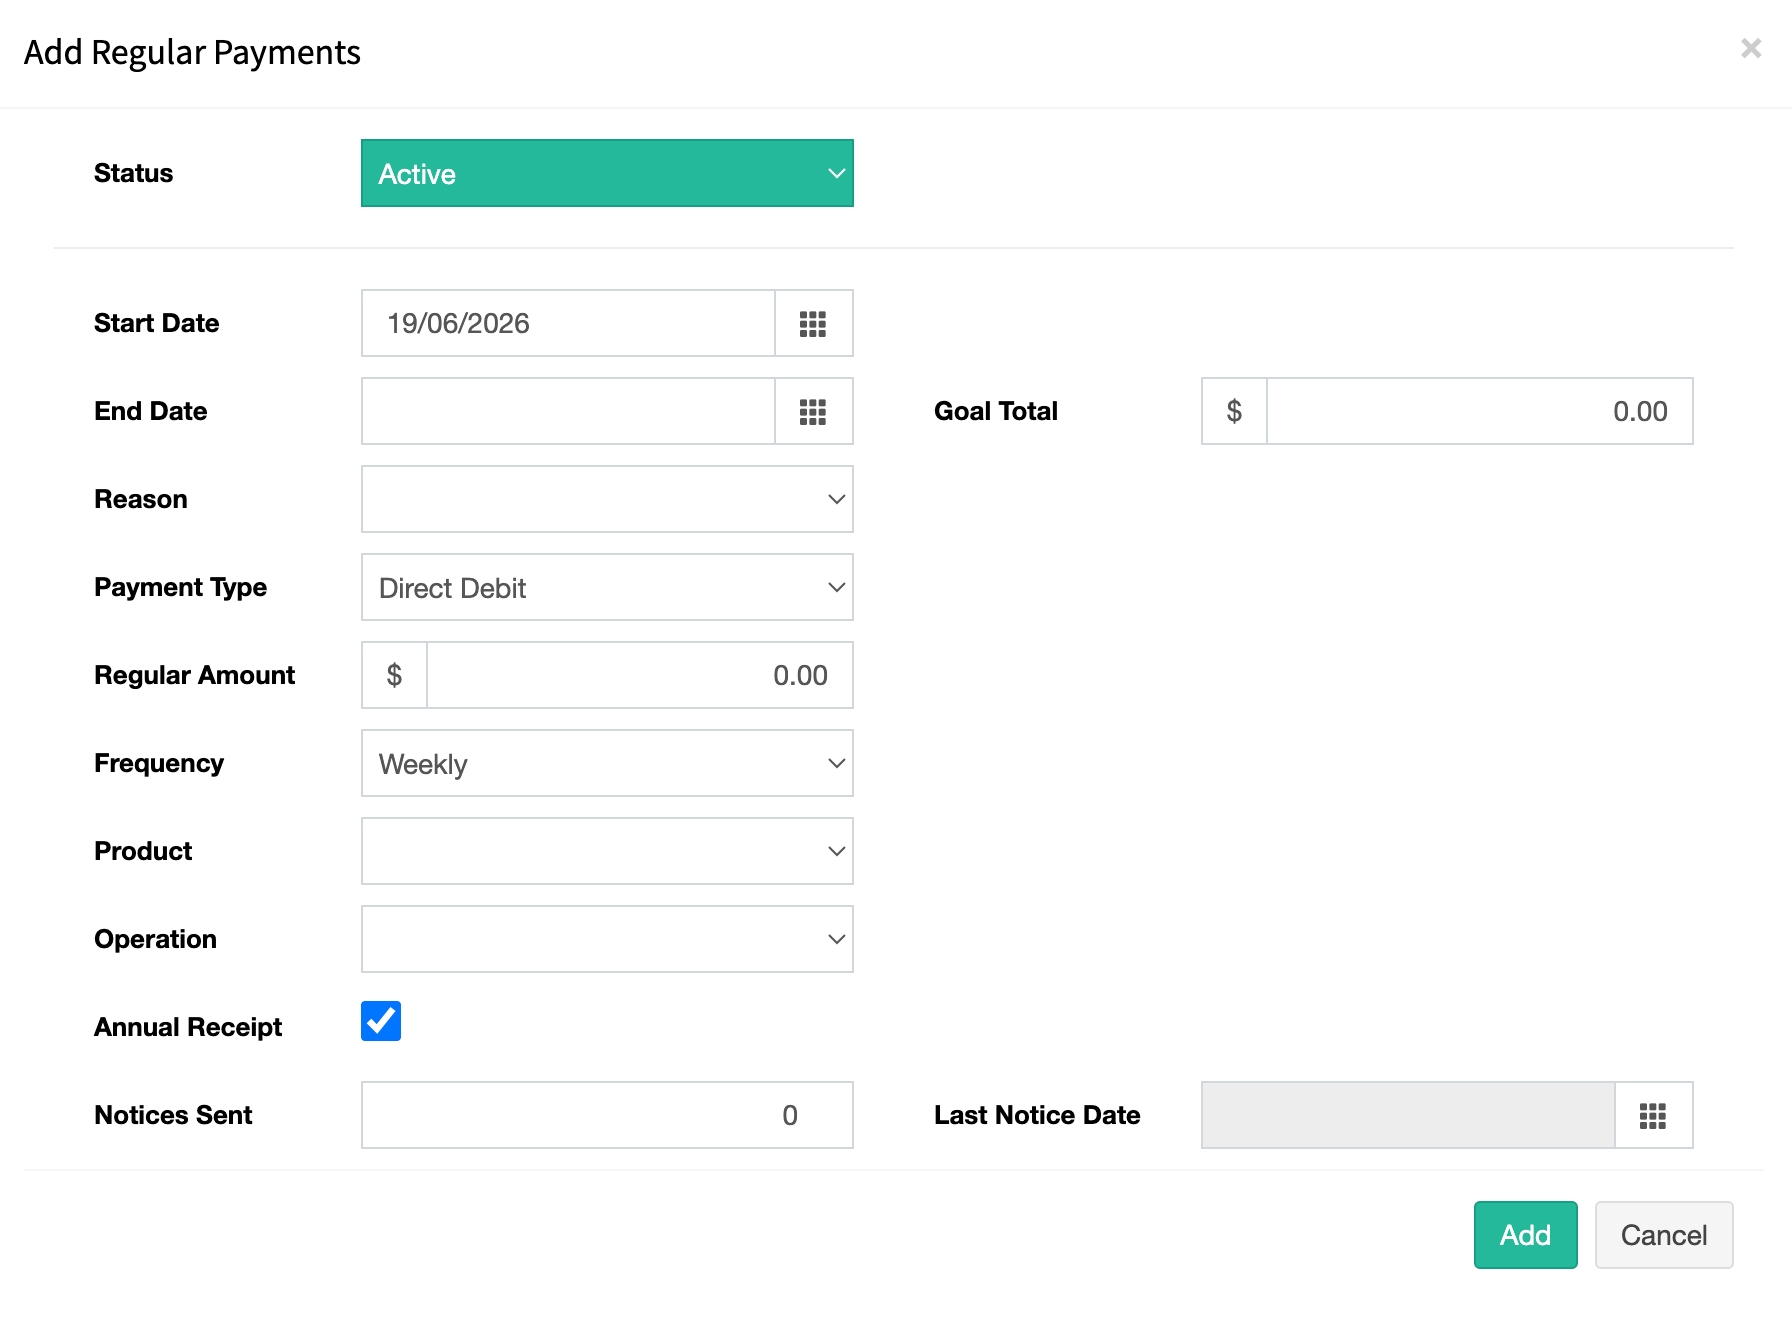
Step 3: Select the Add New Regular Payment button, this will open up the popup box shown below.
Step 4: Once the data has all been added select the Add button and from the Contacts select Save button to save your changes.
Updating a regular payment
Regular payment records can be edited by selecting Edit on the relevant Regular Payment record.
Note: Certain fields cannot be changed after a regular payment has been created. These fields include:
Start Date
Payment Type
Frequency
If any of these fields need to be updated, it is recommended that you:
Add an End Date to the existing regular payment record to archive it.
Create a new regular payment record with the correct details.
This approach ensures that payment history is maintained while accurately reflecting the updated payment arrangement.
Deleting a regular payment
Regular payments can be deleted by selecting the Delete button next to the Edit button in the Regular Payments tab.
Note: Deleting a regular payment will not delete any associated transactions. Existing transactions that were created from the regular payment will remain in the system for historical and reporting purposes.
Field Definitions
Status: field determines whether a regular payment schedule is currently being processed.
Available statuses are:
Active – The regular payment is active and will be included in billing runs.
Paused – The regular payment is temporarily suspended. A Paused Until Date can be entered to indicate when the regular giving schedule should automatically resume.
Archived – The regular payment is no longer active and will not be processed in future billing runs.
Start Date: Determines when the regular payment schedule becomes eligible for billing.
For example, if:
Frequency = Weekly
Start Date = 1 January 2026
The scheduled billings would occur on:
8 January 2026
15 January 2026
22 January 2026
and continue every seven days thereafter.
Note: Regular payment schedules are generated during the overnight billing process and become available in the Billing section after 12:00 am. As a result, newly created schedules will not appear immediately and will be included from the next available billing cycle.
Reason: This field is used for reporting purposes to record why a regular payment has ended. Several default options are provided, including:
Cancelled
Upgraded
Downgraded
Additional end reasons can be added and maintained by users through Settings > User Defined Lists, allowing the list to be customized to meet your organization's reporting requirements.
Payment Type: specifies how the supporter will make their regular donation. Common payment types include: Direct Debit, Credit Card and Automatic Payment Other payment methods configured within your FundraiserOne system user
Frequency: Determines how often the supporter will be billed. Available frequencies include:
Weekly
Fortnightly
Monthly
Quarterly
Six-Monthly
Annually
Select the frequency that matches the supporter’s preferred giving schedule. This frequency is used by the billing process to generate future payment requests automatically.
Products: This field is used to identify what the regular payment is for. This allows you to categorise regular gifts against specific appeals, projects, campaigns, or causes. If your organisation operates multiple fundraising programmes, using different products helps ensure donations are allocated and reported correctly.
In this example, a product called Regular Gift Donation has been created. Products can be configured in the Products section of FundraiserOne and, for regular giving, the product should be assigned a Product Type of Regular Gift.
By using a product with a Regular Gift product type, FundraiserOne can distinguish recurring donations from one-off gifts. Any transactions processed against this product will automatically be recognised as regular gift transactions.
Operation: This determines the income stream, campaign, or fundraising activity that the regular gift will be allocated to when it is processed. Operations help organisations track income against specific fundraising initiatives and provide more detailed reporting on donation performance. For this example, we will use an operation called Regular Giving. To create a new operation navigate to Campaigns and Operations from the menu.
Annual Receipt: Will set all the accompanying transactions to annual receipt instead of individual receipts. This means donors will receive an end of year receipt.
Regular payment end triggers
Goal Total : When a goal total is reached the regular payment will stop processing.
End Date: When the End Date is left blank, the regular payment will continue to run indefinitely according to its configured schedule.
Entering an End Date will stop the regular payment from being processed once that date has been reached. No further transactions will be generated after the end date.
Use the End Date when a regular payment arrangement is expected to finish or when you want to archive an existing regular payment before creating a new one with updated details.
System created batch frequency
The system automatically generates batches for transactions processed through each payment method. Batch names are created using a standard format, for example:
Credit Cards (Billing Period 05/2026)
Similar batches are also generated for:
Direct Debits
Automatic Payments
These batches group transactions for processing and reporting purposes, making it easier to manage and reconcile regular payments.
Batch naming conventions and related settings can be customized as documented in Configuring Regular Payments.